Harpies Guide
Harpie Ladies are a Winged Beast archetype that identify themselves as “Harpie Lady” while face-up on the field or in the graveyard. It focuses on destroying spell and trap cards through Harpies’ Hunting Ground, in addition to returning monsters with Cyber Slash Harpie Lady. Initially, this deck was played as an OTK (One Turn Kill) deck, using cards like Harpie Harpist as well as Harpie’s Feather Rest to give follow up options. Recently, however, Harpie Oracle was released in the most recent tag duel event, which became another consistent way to generate follow up. Harpie being consistent with their kill options and plays have merited them solo Tier 1 status at their prime, and are currently still a tiered deck.
-
The Tie that Binds


The Tie that Binds is one of the two main skills of choice. Not only does it make OTKing easier, but it also allows Cyber Slash Harpie Lady to attack over 3000 attack monsters while Harpie Lady 1 is on the field (usually summoned by Elegant Egotist). Moreover, it obviously allows for being able to attack over monsters in the mirror matchup, as well as other interactions in other matchups (see matchups section). Lastly, the skill is available on ample characters, including Yugi Moto, who obtains it as a reward at Level 13.
-
Harpies’ Hunting Ground

Harpies’ Hunting Ground is the other main skill of choice of the two, obtainable only through Mai Valentine. While it is on the field, any Harpie monster that is normal or special summoned allows the field spell Harpies’ Hunting Ground to destroy a spell or trap card on the field. This is particularly useful with forcing out the opponent’s backrow, as well as destroying problematic floodgates such as Poisonous Winds. Moreover, it can be used to pop the Harpie player’s own Hysteric Sign, allowing them to add 3 Harpie cards at the end phase. Lastly, Harpie Oracle can recycle it from the graveyard if needed. The only downside to Harpies’ Hunting Ground is that the spell trap destruction is a mandatory effect, so it will need to destroy itself if the Harpie player summons a Harpie monster going first. In match formats, Harpies’ Hunting Ground is almost always a sided skill whenever The Tie that Binds is the main skill of choice.
Other Potential Skills


Archetype Related
Harpie Perfumer (3x)

Harpie Perfumer is the main searcher of the deck. It allows the searching of a spell/trap card including “Harpie Lady Sisters” in the card text whenever it is normal or special summoned. This usually leads to Elegant Egotist or Harpie’s Feather Rest being added, depending on the hand (which will be talked about more in the combos section of the guide). Moreover, if a level 5 or higher Harpie monster was on the field prior, Perfumer can add an additional candidate card provided it is a different name from the first.
Harpie Channeler (3x)

Harpie Channeler is the main summoner of the deck. It special summons a “Harpie” monster in face-up defence position from the deck other than Harpie Channeler itself at the cost of discarding a Harpie card. This allows for easy combos into usually either a Cyber Slash Harpie Lady, or a rank 4 XYZ, but sometimes even a rank 7 XYZ if Harpie Channeler summons Harpie’s Pet Dragon, as its level changes to 7 when a Dragon is face-up on the field.
Harpie Lady 1 (1-2x)

Harpie Lady 1 is the main target for Elegant Egotist. Harpie Lady 1 is the preferred choice since it allows for easier OTKs as well as attacking over higher attack monsters with the ability The Tie that Binds. Due to being able to be recycled via Harpie’s Feather Rest, there is no good incentive to run any more than 2, as it does not play a role in the deck’s overall card advantage, and would likely clog the hand of the Harpie player if played at 3.
Harpie Oracle (2x)

The addition of Harpie Oracle through the event ultimately helped Harpie become more consistent as a whole, as it allows the Harpie player to return a Spell/Trap including “Harpie Lady Sisters” in the card text at the End Phase whenever it is normal or special summoned. Moreover, it can be special summoned from the hand if a level 5 or higher Harpie Lady monster is on the field. This restriction is ultimately the factor holding it back from being a 3 of, as it is dependent on other cards to have maximum value.
Harpie Harpist (0-2x)

Harpie Harpist is a card that usually gets cut in the smaller builds (20-23) due to space issues; however, it does see play in the larger builds (closer to 30). Its less common effect is that when it is normal summoned, it can target a respective winged beast type monster alongside an opposing face-up monster and return them to the hand. Its main effect, however, is that when it is sent to the graveyard by any means, it can add a Winged Beast monster with 1500 or less Attack points from the deck to the hand at the end phase. This is often done through discarding it with Harpie Channeler for maximum value. Note that Harpie Harpist must stay in the graveyard to activate its effect, and so returning it to the deck by Harpie’s Feather Rest will take away the opportunity to add a Harpie monster.
Cyber Harpie Lady (0-1x)

Cyber Harpie Lady is nother potential target for Elegant Egotist that is less commonly seen. Cyber Harpie Lady is simply a beatstick that can occasionally attack over monsters Harpie Lady 1 would not be able to, most notably against Fire King’s Level 4 monsters in the current meta as well as the mirror matchup.
Harpie’s Pet Dragon (0-1x)

Harpie’s Pet Dragon makes the list in specifically the large build due to the abundance of Number 18: Heraldry Patriarch being summoned against Harpies. It is an option to summon off of Harpie Channeler. Not only does Harpie’s Pet Dragon avoid the destruction effect due to not being treated as a Harpie Lady itself, but in tandem with Channeler, it can both beat over Number 18: Heraldry Patriarch, or, more commonly, make a Rank 7 XYZ in with Harpie Channeler since its level changes to 7 with Harpie’s Pet Dragon on the field.
Cyber Slash Harpie Lady (2x)

The main boss monster of Harpies, which can be summoned by treating one Harpie Lady as a tuner monster. Cyber Slash Harpie Lady can either return an opposing monster, or a face-up Harpie monster on the controller’s field to the hand when a spell/trap or spell/trap effect is activated. Moreover, it allows Harpie’s Feather Rest, Harpie Perfumer, and Harpie Oracle to get their maximum benefit since it is a candidate level 5 or higher Harpie monster.
Elegant Egotist (2x)

Elegant Egotist is the main spell that allows Harpies to consistently swarm the field, generally through Harpie Perfumer or Hysteric Sign adding it to the hand. It summons a card whose name is Harpie Lady from the hand or deck. This usually limits the special summon to Harpie Lady 1 and Cyber Harpie Lady, as the other played Harpie monsters are only considered as “Harpie Lady” on the field or in the graveyard.
Harpie’s Feather Rest (1x)

Harpie’s Feather Rest is an archetype “Pot of Avarice”, allowing the Harpie player to target 3 Harpie Lady/Harpie Lady Sisters, shuffle them back into the deck, and draw 1 card, or draw 2 cards if the controlling player has a level 5 or higher Harpie monster on the field. This card then locks the Harpie player out of any special summons involving a non-wind monster for the rest of the turn. This is important because non-wind XYZ monsters can be summoned prior to activating Harpie’s Feather Rest, so it is critical to take advantage of that whenever possible.
Harpies’ Hunting Ground (0-1x)

As mentioned previously, the skill Harpies’ Hunting Ground puts the field spell Harpies’ Hunting Ground on the field, but Harpies’ Hunting Ground itself is usually also a staple to run in the main deck whenever The Tie that Binds is being used instead. It can be easily accessed via Harpie Perfumer in cases that Elegant Egotist and/or Harpie’s Feather Rest are already in the hand in order to address opposing backrow. It also boosts winged beast monsters by 200 attack, allowing easier attacks over high attack monsters.
Hysteric Sign (0-3x)

Similar to Harpie Harpist, Hysteric Sign gets cut in the smaller builds, but generally gets maxed in the larger builds. It allows the Harpie player to add an Elegant Egotist from the deck or graveyard to the hand. Moreover, if it is sent to the graveyard from either the hand or the field, it allows the Harpie player to add up to 3 Harpie cards with different names from the deck to the hand. Note that Hysteric Sign can only use one of these effect per turn and only once that turn, so destroying it by Harpies’ Hunting Ground after adding Elegant Egotist with the first effect will not allow the adding of 3 Harpie cards at the end phase; therefore, if one wants to use the effect to search, do not use the effect to add an Elegant Egotist.
Hysteric Party (0-3)

Hysteric Party occasionally sees play in the smaller builds, but always gets played in varied amounts in the larger builds. It allows the Harpie player to special summon as many Harpie Lady monsters as possible at the cost of discarding a card, but destroys the ones summoned by its effect when it leaves the field. Hysteric Party is generally used either as a last resort if all other plays get stopped, or as an OTK enabler if it is deemed safe to push with it.
Swallow’s Nest (3x)

Swallow’s Nest is the strongest follow-up card that Harpie players can run. It summons a winged-beast monster of identical level at the cost of tributing a winged-beast monster. Since Swallow’s Nest is a quick-play spell, it allows the Harpie player to still be able to combo more often than not going second since it can be chained to backrow (barring the opponent having multiple backrow to disrupt combos). Moreover, it allows Harpies to consistently combo in case their initial hand did not consist of the usual starters in Harpie Channeler and Harpie Perfumer (see combos section for more details). Lastly, it allows for more aggressive pushes for lethal turn 2 and onwards in the cases of an attack getting disrupted by a handtrap such as Sphere Kuriboh.
Book of Moon (0-3x)

Book of Moon is one of the best generic spells in the meta that is played in varied amounts in both variations. It targets a face-up monster on the field, and puts it face-down. Similar to Swallow’s Nest, Book of Moon being a quick-play spell allows it to be used both defensively, and sometimes, even offensively by playing around problematic threats such as Number 18: Heraldry Patriarch.
Treacherous Trap Hole (0 or 2x)


Treacherous Trap Hole is one of the main backrow in the smaller build, but does not see as much play in the larger build. It targets 2 monsters on the field and destroys them provided there are no Trap cards in the graveyard. This card usually allows for quick turn 3/4 victories in the smaller build.
Glife the Phantom Bird (0-1x)

Similar to Harpie’s Pet Dragon, Glife the Phantom BIrd has recently become more popular with the abundance of Number 18: Heraldry Patriarch being played against Harpies, allowing the Harpie player to play around the destruction effect easier. Not only is Glife the Phantom BIrd a Swallow’s Nest target, but when it is normal or special summoned, it can destroy an opponent’s spell/trap card. This forces the opponent to use their backrow earlier than they want, allowing for the Harpie player to combo easier. Its one downside is that other than Swallow’s Nest being able to summon it or use it as a tribute, it cannot be searched by any means.
Forbidden Lance (0-2x)

Forbidden Lance is a quick-play spell that protects a monster from spell/trap effects by losing 800 attack points. This is a multipurpose card that can both protect one’s Harpie monsters from backrow disruption, as well as allowing Harpie monsters to attack over certain cards that are of higher attack points. This is ideal to use with Cyber Slash Harpie Lady, as Swallow’s Nest is unable to protect it, unlike the Level 4 Harpie monsters.
Neos Fusion (0 or 2x)

Neos Fusion is an option specifically for larger builds. It summons an Elemental HERO Brave Neos from the extra deck by sending an Elemental HERO Neos and a level 4 or lower effect monster from the hand, deck, and/or field to the graveyard, which can allow the Harpie player to have yet another outing option to Number 18: Heraldry Patriarch. Moreover, sending Harpie Harpist as the effect monster allows the Harpie player to add a Harpie monster at the end phase. Lastly, if Elemental HERO Brave Neos destroys a monster by battle, it can add another copy of Neos Fusion, which is ideal as a discard outlet since it has another effect that protects Elemental HERO Brave Neos from destruction by battle or card effect at the cost of banishing it from the graveyard.
Karma Cut (0-3x)

Karma Cut is a card that is played in varied amounts in the larger build. It banishes an opposing monster on the field, as well as all other copies with the same name in the graveyard at the cost of discarding a card. On top of Karma Cut being great against specific matchups in the meta, it is also a discard outlet for Hysteric Sign or Harpie Harpist, allowing for potential combos on the Harpie player’s next turn.
Raigeki Break (0-3x)

Karma Cut is a card that is played in varied amounts in the larger build. It destroys a card on the field at the cost of discarding a card. Moreover, similar to Karma Cut, it is also a discard outlet for Hysteric Sign or Harpie Harpist, allowing for potential combos on the Harpie player’s next turn.
Divine Wrath (0-3x)

Divine Wrath is another card played in varied amounts in the larger build. It allows the negation of a monster effect at the cost of discarding a card. Similar to Karma Cut, Divine Wrath provides a discard outlet for Hysteric Sign or Harpie Harpist, but unlike negation cards such as Fiendish Chain, Divine Wrath prevents Swallow’s Nest from being chained since counter traps are spell speed 3, effectively only allowing respective counter traps to be chained to it.
Ultimate Providence (0-3x)

Similar to Divine Wrath, Ultimate Providence allows the negation of a spell, trap, or monster effect at the cost of discarding a card of the same type (spell, trap, or monster respectively). While it is more situational to use as a discard outlet to Hysteric Sign or Harpie Harpist, it is sometimes preferred to have the versatility of negating more than just monster effects, and is therefore sometimes played over Divine Wrath in the larger builds.
Hallowed Life Barrier (0-3x)

Hallowed Life Barrier is a trap card that allows the Harpie player to survive OTKs easier with Hey, Trunade! being a major weakness of the deck. It prevents all damage taken in the turn at the cost of discarding a card. Moreover, similar to the other discard traps, it is a discard outlet for Hysteric Sign and Harpie Harpist, allowing for potential follow up options.
Damage Diet (0-2x)

Damage Diet is a trap card that allows the Harpie player to survive OTKs easier with Hey, Trunade! being a major weakness of the deck. It halves all damage taken in the turn. Moreover, it has a second effect that halves effect damage at the cost of banishing itself. This is particularly useful to use with Cyber Slash Harpie Lady, as it allows a free bounce of a card. Unfortunately, the banish effect of Damage Diet can only be used on the controlling player’s turn, so Cyber Slash Harpie Lady can only bounce a monster through its effect then and not on the opponent’s turn.
Here are some other cards that can be used either in the side deck or as a tech in the main deck. Note that the majority of the remaining cards in this list would only see play in the large build, as the tech space for the small build is obviously limited, and would usually play a combination of the techs listed above instead.


Here are some other cards that can be used in the Extra Deck:


Firered550’s 1st Place MCS 42 Deck

Dmitri’s Top 8 Meta Weekly 177 Deck:
Luke Tyler’s Top 4 MCS 42 Deck
Large Build Decklists
LoreRomaCCG’s Top 16 Meta Weekly 177 Deck:

CosmicFlareXL’s Runner Up Meta Weekly 178 Deck:

A couple remarks before diving into the combos:
- Any combo that does not involve the entire hand, in addition to combos that involve using Harpie’s Feather Rest does not take into consideration the random cards, so the situations will vary depending on what is in hand (i.e. set any live backrow if there is one). Specific non-guaranteed extensions for Harpie’s Feather Rest that are worth mentioning will be said after the combo.
- Any combo involving Elegant Egotist can also be done through Hysteric Sign since it can add Elegant Egotist to the hand; however, for simplicity sake, we are only mentioning Elegant Egotist since it is the actual card used for the combos. Moreover, Elegant Egotist can summon Cyber Harpie Lady instead of Harpie Lady 1, but again, only Harpie Lady 1 was mentioned for simplicity sake since the combos remain the same.
- For the sake of simplicity, only turn 1 combos will be mentioned. For turn 2 combos, the main difference is when an opportunity to go for lethal presents itself (i.e. at most 1 monster on the opponent’s field), add Elegant Egotist instead of Harpie’s Feather Rest so that Cyber Slash Harpie Lady can potentially bounce an opponent’s monster and swing for lethal alongside the monster summoned off of Elegant Egotist.
Turn 1 Combos:
- Combo #1: Harpie Perfumer Summon Harpie Perfumer and use its effect to add Elegant Egotist. Activate Elegant Egotist to summon Harpie Lady 1. Send Harpie Perfumer and Harpie Lady 1 to the graveyard for Cyber Slash Harpie Lady. Alternatively, overlay both for rank 4 XYZ summon. Final field: Cyber Slash Harpie Lady/rank 4 XYZ, and 3 other cards.
- Combo #2: Harpie Monster+Elegant Egotist Summon the Harpie monster. Activate Elegant Egotist to summon Harpie Lady 1. Send Harpie monster and Harpie Lady 1 to the graveyard for Cyber Slash Harpie Lady. Alternatively, overlay both for rank 4 XYZ summon. Final field: Cyber Slash Harpie Lady/rank 4 XYZ, and 2 other cards.
- Combo #3: Harpie Monster+Swallow’s Nest Summon the Harpie monster. Activate Swallow’s Nest and summon Harpie Perfumer by tributing it. Use its effect to add Elegant Egotist. Activate Elegant Egotist to summon Harpie Lady 1. Send Harpie Perfumer and Harpie Lady 1 to Synchro summon Cyber Harpie Lady. Alternatively, overlay both for rank 4 XYZ summon. Add back Elegant Egotist at the end phase. Final field: Cyber Slash Harpie Lady/rank 4 XYZ and 2 other cards. Note: If Harpie Oracle was the specific Harpie monster, then use its effect prior to activating Swallow’s Nest in order to add back Elegant Egotist at the end phase.
- Combo #4: Harpie Perfumer+Swallow’s Nest Summon Harpie Perfumer and use its effect to add Elegant Egotist. Activate Swallow’s Nest to summon Harpie Oracle and use its effect. Activate Elegant Egotist to summon Harpie Lady 1. Send Harpie Oracle and Harpie Lady 1 to Synchro summon Cyber Harpie Lady. Alternatively, overlay both for rank 4 XYZ summon. Add back Elegant Egotist at the end phase. Final field: Cyber Slash Harpie Lady/rank 4 XYZ, Elegant Egotist in hand, and 2 other cards.
- Combo #5: Harpie Channeler+Harpies’ Hunting Ground/Harpie’s Feather Rest Summon Harpie Channeler and use its effect to discard the Harpie card to special summon Harpie Oracle and use its effect. Send Harpie Channeler and Harpie Perfumer to Synchro summon Cyber Slash Harpie Lady. Alternatively, overlay both for rank 4 XYZ summon. Add back the Harpie spell at the end phase Final field: Cyber Slash Harpie Lady/rank 4 XYZ, Harpies’ Hunting Ground/Harpie’s Feather Rest and 2 other cards.
- Combo #6: Harpie Channeler+Harpie Monster: Summon Harpie Channeler and use its effect to discard the Harpie monster to special summon Harpie Perfumer. Use its effect to add Harpie’s Feather Rest. Send Harpie Channeler and Harpie Perfumer to Synchro summon Cyber Slash Harpie Lady. Activate Harpie’s Feather Rest, shuffling 3 Harpie Lady cards in the graveyard back into the deck to draw 2 cards. Final field: Cyber Slash Harpie Lady and 4 other cards
- Combo #7: Harpie Oracle+Swallow’s Nest+Harpie Monster Summon Harpie Oracle and use its effect. Active Swallow’s Nest to special summon Harpie Channeler by tributing Harpie Oracle. Use its effect to discard the Harpie monster to special summon Harpie Perfumer and use its effect to add Harpie’s Feather Rest. Send Harpie Channeler and Harpie Perfumer to Synchro summon Cyber Slash Harpie Lady. Activate Harpie’s Feather Rest, shuffling 3 Harpie Lady cards in the graveyard back into the deck to draw 2 cards. Add Harpie’s Feather Rest back at the end phase. Final field: Cyber Slash Harpie Lady, Harpie’s Feather Rest in hand, and 3 other cards. Note: If Elegant Egotist is drawn, activate it to special summon Harpie Lady 1, and then add back Elegant Egotist at the end phase instead.
- Combo #8: Harpie Perfumer+Swallow’s Nest+Harpie Monster Summon Harpie Perfumer and use its effect to add Harpie’s Feather Rest. Activate Swallow’s Nest to special summon Harpie Channeler by tributing Harpie Perfumer. Use its effect to discard the Harpie monster to special summon Harpie Oracle and use its effect. Send Harpie Channeler and Harpie Oracle to Synchro summon Cyber Slash Harpie Lady. Activate Harpie’s Feather Rest, shuffling 3 Harpie Lady cards in the graveyard back into the deck to draw 2 cards. Add back Harpie’s Feather Rest at the end phase. Final field: Cyber Slash Harpie Lady, Harpie’s Feather Rest in hand, and 3 other cards. Note: If Elegant Egotist is drawn, activate it to special summon Harpie Lady 1, and then add back Elegant Egotist at the end phase instead.
- Combo #9: Harpie Channeler+Elegant Egotist/Harpie’s Feather Rest+Harpie Monster
Summon Harpie Channeler, use effect to discard the Harpie monster to special summon Harpie Perfumer. Harpie Perfumer adds Elegant Egotist/Harpie’s Feather Rest (whichever is not currently in the hand). Send Harpie Channeler and Harpie Perfumer to Synchro summon Cyber Slash Harpie Lady. Activate Harpie’s Feather Rest, shuffling 3 Harpie Lady cards in the graveyard back into the deck to draw 2 cards.
Final field: Cyber Slash Harpie Lady, Elegant Egotist in hand, and 3 other cards.
Notes:
- If Harpie Oracle is drawn, activate Elegant Egotist to summon Harpie Lady 1, and special summon Harpie Oracle from the hand in face-up defence mode. Use its effect to add back Elegant Egotist at the end phase. (Warning: A rank 4 XYZ is unable to be made due to the restriction of Harpie’s Feather Rest).
- If it is turn 2, always activate Elegant Egotist after the summon of Cyber Slash Harpie Lady and potentially use Cyber Slash Harpie Lady’s effect to bounce an opposing monster to go for lethal. This should be done prior to activating Harpie’s Feather Rest in order to minimize chances of drawing copies of Harpie Lady 1.
- Combo #10: Harpie Oracle+Swallow’s Nest+Elegant Egotist/Harpie’s Feather Rest+Harpie Monster Summon Harpie Oracle and use its effect. Activate Swallow’s Nest to special summon Harpie Channeler by tributing Harpie Oracle. Use its effect to discard the Harpie monster to special summon Harpie Perfumer and use its effect to add Elegant Egotist/Harpie’s Feather Rest (whichever is not currently in the hand). Send Harpie Channeler and Harpie Perfumer to Synchro summon Cyber Slash Harpie Lady. Activate Elegant Egotist to summon Harpie Lady 1. Activate Harpie’s Feather Rest, shuffling 3 Harpie Lady cards in the graveyard back into the deck to draw 2 cards. Add Elegant Egotist back at the end phase. Final field: Cyber Slash Harpie Lady, Harpie Lady 1, Elegant Egotist in hand, and 2 other cards. Note: If Elegant Egotist is in hand, an alternative ending board provided Harpie Lady 1 is not discarded for Harpie Channeler} is to add Elegant Egotist instead of Harpie’s Feather Rest, which allows for a rank 4 XYZ of choice at the end. Keep in mind, however, that the added back Elegant Egotist will be dead, so only do this if deemed necessary for the deck being played against (see matchups section).
- Combo #11: Harpie Perfumer+Swallow’s Nest+Elegant Egotist/Harpie’s Feather Rest+Harpie Monster Summon Harpie Perfumer and use effect to add Elegant Egotist/Harpie’s Feather Rest (whichever is not currently in the hand). Activate Swallow’s Nest to special summon Harpie Channeler by tributing Harpie Perfumer. Use its effect to discard the Harpie monster to special summon Harpie Oracle and use its effect. Activate Elegant Egotist to summon Harpie Lady 1. Send Harpie Channeler and Harpie Oracle to Synchro summon Cyber Slash Harpie Lady. Activate Harpie’s Feather Rest, shuffling 3 Harpie Lady cards in the graveyard back into the deck to draw 2 cards. Add Elegant Egotist back at the end phase. Final field: Cyber Slash Harpie Lady, Harpie Lady 1, Elegant Egotist in hand, and 2 other cards. Note: If Elegant Egotist is in hand, an alternative ending board provided Harpie Lady 1 is not discarded for Harpie Channeler} is to add Elegant Egotist instead of Harpie’s Feather Rest, which allows for a rank 4 XYZ of choice at the end. Keep in mind, however, that the added back Elegant Egotist will be dead, so only do this if deemed necessary for the deck being played against (see matchups section).
- Combo #12: Harpie Channeler+Elegant Egotist+Harpie’s Feather Rest+Harpie Monster that is not Harpie Lady 1 Summon Harpie Channeler, use effect to discard the Harpie monster to special summon Harpie Perfumer. Harpie Perfumer adds Elegant Egotist to the hand. Activate Elegant Egotist to summon Harpie Lady 1. Send Harpie Lady 1 and Harpie Perfumer to the graveyard to Synchro summon Cyber Slash Harpie Lady Activate the second Elegant Egotist to summon the second copy of Harpie Lady 1. XYZ both level 4s into a rank 4 XYZ of choice (see matchup section for more clarification on which one to make). Activate Harpie’s Feather Rest, shuffling 3 Harpie Lady monsters in the graveyard back into the deck to draw 2 cards. Final field: Cyber Slash Harpie Lady, rank 4 XYZ, and 2 other cards.
- Combo #13: Harpie Channeler+Harpie Oracle+Elegant Egotist/Harpie’s Feather Rest+Harpie Monster Summon Harpie Channeler, use effect to discard the Harpie monster to special summon Harpie Perfumer. Harpie Perfumer adds Elegant Egotist/Harpie’s Feather Rest (whichever is not currently in the hand). Activate Elegant Egotist to summon Harpie Lady 1. Send any 2 Harpies to the graveyard to Synchro summon Cyber Slash Harpie Lady Special summon Harpie Oracle from the hand and use the effect. XYZ both level 4s into a rank 4 XYZ of choice (see matchup section for more clarification on which one to make). Activate Harpie’s Feather Rest, shuffling 3 Harpie Lady monsters in the graveyard back into the deck to draw 2 cards. Add Elegant Egotist back at the end phase. Final field: Cyber Slash Harpie Lady, rank 4 XYZ, Elegant Egotist in hand, and 2 other cards.
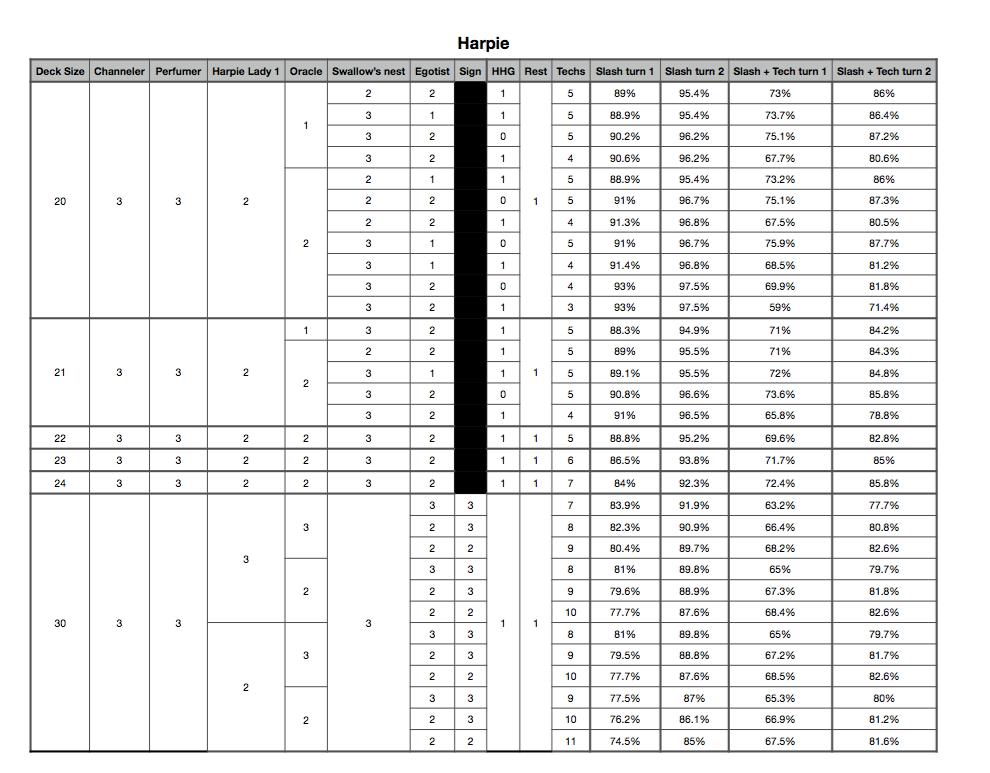
This section is specifically for those who are interested in the probabilities of certain hands given deck size. Shoutout to Maz Li for creating this probability table which has common probabilities for deck sizes of 20 cards all the way up to 30 cards.
Harpie (Mirror)
We will start by analyzing the “mirror” matchup. Note that this is not always a true mirror, as the “mirror” can be small build vs large build, small build vs small build, or large build vs large build. Keep in mind that with all 3 matchups, Elegant Egotist becomes free to use at any point a “Harpie Lady” is on the field, regardless of the side it is on. Moreover, the boost from Harpie Lady 1 affects both fields, occasionally resulting in altering the order of what gets sent for Cyber Slash Harpie Lady and/or rank 4 XYZs. Lastly, Harpies’ Hunting Ground can be used by both players, and so it is common to see both players use the skill The Tie that Binds in match play if it is not already the case in game 1. This is primarily due to the fact that the player going first can more often than not cause a self-destruct of Harpies’ Hunting Ground, effectively causing the Harpie Player using that skill to technically be playing without one (although Harpie Oracle can recycle it later on if need be).
We will start with the true mirrors (i.e. small build vs small build or large build vs large build). For both sides, unlike most matchups, where Cyber Slash Harpie Lady is the preferred summon of choice from the Extra Deck, it is ideal to prioritize summoning Number 18: Heraldry Patriarch, instead. Number 18: Heraldry Patriarch prevents the opponent from having any two Harpie Lady monsters on the field, as they share the common condition of being treated as “Harpie Lady” on the field. If the opponent controls any combination of Harpie Lady, Harpie Channeler, Harpie Perfumer, Harpie Oracle, Harpie Lady 1, Harpie Harpist, Cyber Harpie Lady or Cyber Slash Harpie Lady, then Number 18: Heraldry Patriarch can detach an xyz Material to choose one of them and destroy all others. This effect does not target, so if Swallow’s Nest, for instance, is chained to its activation, Heraldry Patriarch will still resolve and choose a monster after Swallow’s Nest tributes a Harpie monster and summons another from the deck, leading to the destruction of the other(s). Moreover, this effect applies to the user’s own monsters as well, so it is advisable to target one’s own “Harpie Lady” in order to destroy the opponent’s; otherwise, the user will have their “Harpie Lady” destroyed in the process. This effect is not once per turn, but rather, once per Chain, so it can be activated again after the chain resolves, provided its condition of multiple monsters with the same name being on the field is met. Lastly Number 18: Heraldry Patriarch has a lingering effect that prevents the opponent from summoning monsters with the chosen monster’s name as long as it remains face-up on the field. Since Harpie Lady 1 and Cyber Harpie Lady are always treated as “Harpie Lady”, regardless of location, they are unable to be summoned, including by Elegant Egotist. As a result, Number 18: Heraldry Patriarch demands specific hands from the player going second to be able to play the duel. For the large build, any of Book Of Moon, Karma Cut, Divine Wrath will help out with the card, although Book of Moon is the only card that could be used on turn 2 to attempt comboing. The smaller build, however, has Book of Moon, as well as Treacherous Trap Hole for potential outs to Number 18: Heraldry Patriarch, with the convenience that they are more likely to see one of those techs with being a smaller build. Lastly, it is critical to hold Swallow’s Nest in the hand going second to have a follow-up option in case a backrow attempts to disrupt a combo, and can also be used to special summon non-Harpie winged beasts such as Glife the Phantom Bird which can destroy a spell/trap card when summoned or Blackwing - Zephyros the Elite, the latter being effective in large builds to return a Hysteric Sign to the hand to use for a discard later. One can also potentially use Glife the Phantom Bird and Blackwing - Zephyros the Elite to play around Number 18: Heraldry Patriarch by chaining Swallow’s Nest to one’s own Elegant Egotist or Harpie Channeler effect to summon them, which then allows for the Synchro Summon Cyber Slash Harpie Lady and proceed. Note that it is important to play around Number 18: Heraldry Patriarch in the following method above, as while it can be chained to the actual effect, doing it this way will allow the opponent to target Harpie Lady and shut off Elegant Egotist while it remains on the field. Another notable interaction with Number 18: Heraldry Patriarch is if the opponent attempts to summon it while the user controls a Cyber Slash Harpie Lady and a level 4 Harpie monster, then Swallow’s Nest can be used directly on the summon, allowing not only to summon Harpie Perfumer or Harpie Oracle for more resources, but more importantly, it allows Cyber Slash Harpie Lady to safely return Number 18: Heraldry Patriarch to the extra deck without consequence.
Now, we will talk about the large build playing against the small build. As it turns out, the large build has a slight edge over the small build. This is mainly due to the fact that the large build has ample counters to both Number 18: Heraldry Patriarch and Cyber Slash Harpie Lady, and, as a result, can usually grind out the win by out-resourcing the small build, most notably with Hysteric Sign acting both as a combo enabler and a resource manager. As the person playing the large build against the smaller one, it is critical to conserve one for one backrow such as Karma Cut specifically for Number 18: Heraldry Patriarch and/or Cyber Slash Harpie Lady, as it is more likely that the opponent either opens with a Number 18: Heraldry Patriarch going first, or have a Swallow’s Nest going second as a follow up to one for one backrow used on a level 4 Harpie monster. Similarly, if a counter trap such as Divine Wrath is set, it is advisable to use it against either Number 18: Heraldry Patriarch or Cyber Slash Harpie Lady, as in both situations, the player using the small build is losing the most amount of resources, and will likely not have a follow-up. Additionally, using Divine Wrath against Harpie Channeler can also be advisable in times Number 18: Heraldry Patriarch cannot be summoned since it will stop the play cold, with the exception of a Harpie monster being on the field for Elegant Egotist. Lastly, the large build has the option of summoning Harpie’s Pet Dragon if played to bypass the destruction effect of Number 18: Heraldry Patriarch, allowing for a Mecha Phantom Beast Dracossack to out it. Finally, we will talk about the small build playing against the large build. While the large build does have an edge over the small build, the advantage of the small build is that it is more aggressive in nature since it is more concise with its card pool, and, therefore, is more likely to see more optimal starting turn 1 combos in contrast to the larger build. Examples of such boards are a protected Number 18: Heraldry Patriarch, or even a protected Number 18: Heraldry Patriarch and Cyber Slash Harpie Lady in the most optimal case. As such, it is important to be the aggressor with the small build whenever possible because the large build can outresource the smaller build over time, effectively making the matchup worse the longer it drags on. The necessity to open well in the small build is ultimately what gives it a slight disadvantage over the large one.
Side Deck:

Options for the large build:

Blue-Eyes
Despite the May 2021 Forbidden/Limited List regulations hindering Blue-Eyes’ consistency in tournaments by forcing deck builds to choose between a single copy of Azure-Eyes Silver Dragon and The Melody of Awakening Dragon, it is still a popular choice on the ladder and in tournaments. The Blue-Eyes Harpie matchup is skill dependent; Harpie players have a winning matchup with The Tie that Binds, and a losing matchup with Harpies’ Hunting Ground.
As such, Blue-Eyes have influenced the skill decision for Harpie players, both before and after the May 2021 regulations. The main issue with Harpies’ Hunting Ground is that it is a vulnerable target to a turn 1 Dragon Spirit of White and its effect to banish a spell or trap card when special summoned. This usually occurs off of Ancient Rules summoning it from the hand, or White Stone of Ancients special summoning it at the end phase through Cards Of Consonance, or Sage With Eyes Of Blue sending it to the graveyard. The seemingly innocent banish makes the matchup notably difficult since Harpie struggles with getting over 3000 attack or defence. Moreover, Harpie Oracle is only able to recycle cards from the graveyard, and, as a result, is unable to recycle a banished Harpies’ Hunting Ground. As a final “nail in the coffin”, while Cyber Slash Harpie Lady can return Blue Eyes White Dragon to the hand, it can potentially help fuel their skill Ultimate Dragons, which allows them to be able to make a powerful fusion monster in Blue-Eyes Twin Burst Dragon or Neo Blue-Eyes Ultimate Dragon, both of which again have too much attack for Harpies to deal with under usual circumstances.
The skill The Tie that Binds, however, fixes that exact problem, allowing Cyber Slash Harpie Lady to exceed the 3000 attack threshold necessary to destroy an attack position Blue-Eyes White Dragon or a defense position Blue-Eyes Spirit Dragon or Azure-Eyes Silver Dragon in tandem with a Harpie Lady 1 summoned off of Elegant Egotist (it reaches a minimum of 3100 attack). As of late, running Azure-Eyes Silver Dragon has been the more popular limit option that Blue-Eyes players have chosen to run. It should be noted that the effect of Azure-Eyes Silver Dragon not only grants immunity of the destruction of the current dragon monsters on the field by card effect, but also the immunity of dragon monsters being targeted as well. The targeting part of the ability specifically is significant because not only does it prevent Cyber Slash Harpie Lady from targeting the monster period, but, in the very worst case, forces Cyber Slash Harpie Lady to bounce itself if Cyber Slash Harpie Lady is the only candidate target on the field to return. Fortunately, the effect can be chained to prior to the resolution of the immunity taking place, so chaining a Book of Moon or Treacherous Trap Hole to the effect of Azure-Eyes Silver Dragon will take care of the field more often than not. Moreover, chaining cards that negate such as Forbidden Chalice, or Fiendish Chain to the trigger effect of Azure-Eyes Silver Dragon not only negates the immunity, but also destroys it in the end phase if it was summoned through Blue-Eyes Spirit Dragon.
Another trend Blue-Eyes players have been doing is running counter traps such as Divine Wrath in the main deck. It is critical to recognize when exactly the hourglass lights up when there is only one backrow. If the hourglass lights up on a summon, then the set is not a counter trap; however, if there is no hourglass on a summon, then it is likely that there is a counter trap set. This is because it is not possible to tell right away if there is a counter trap on a trigger effect such as Harpie Perfumer since the hourglass could be lighting up on the summon or the effect; however, it becomes clear which one it is after activating Elegant Egotist since it is a summon that does not have a trigger effect. At this point, it is critical to not use the effect of Cyber Slash Harpie Lady to bounce until it is safe to do so (i.e. no cards in the opponent’s hand) because it is highly probable that the counter trap will be used in response to negate and destroy it.
Side deck/tech choices:


A choice for the large build:
Fire King
Fire Kings are one of the more resilient decks in Duel Links, and are only a favorable matchup for Harpie variants using Harpies’ Hunting Ground. Fire Kings pose multiple layers of disruption through the negation effect of Fire King Avatar Arvata, as well as the monster-clearing effect of Fire King High Avatar Garunix. Not only can the Fire King player consistently search combo pieces through Fire King Island and Fire Formation - Tenki, but they can also special summon them through Onslaught of the Fire Kings, as well as Fire King Avatar Arvata from the graveyard, both of which destroy the monster summoned in the end phase to trigger the effect of Fire King High Avatar Garunix in the next standby phase to revive itself and destroy all other monsters. Moreover, the deck is usually rounded off with a variety of hand traps such as Sphere Kuriboh, Battlin’ Boxer Veil, and sometimes Kiteroid. In order for Harpies to win the matchup, they need to minimize Fire Kings’ chances of setting up ideally. One way to do this is by returning Fire King High Avatar Garunix to the hand with Cyber Slash Harpie Lady’s effect if it is summoned off of Onslaught of the Fire Kings to prevent its destruction at the end phase. Large builds having access to Karma Cut can be notable for banishing either a Fire King High Avatar Garunix or a Fire King Avatar Arvata as well as any additional copies of its target in the graveyard, ultimately preventing a loop of two Fire King High Avatar Garunix in the graveyard.
Skill selection is critical against Fire Kings, with Harpies’ Hunting Ground being the preferred skill for this matchup. While {!The Tie That Bind} is not particularly useless against them since it can allow Cyber Slash Harpie Lady to attack over Fire King High Avatar Garunix with 2 mosnters after the boost, Harpies’ Hunting Ground has better utility for the matchup. It helps outresource Fire Kings by constantly threatening not only their set spells/traps, but Fire King Island as well, which once sent to the graveyard or banished will destroy all monsters they control upon resolution. Without Fire King Island, Fire Kings can struggle to establish their Fire King High Avatar Garunix loop or maintain their field presence. Harpies’ Hunting Ground is especially effective here as Fire Kings have no innate way to deal with it, and rely on techs such as Mystical Space Typhoon in order to out the card. Unlike in the Blue-Eyes matchup, this allows Harpie Oracle to recycle Harpies’ Hunting Ground if possible since it will be in the graveyard as opposed to banished. Fire Kings choose to play Mystical Space Typhoon over Cosmic Cyclone because not only does Cosmic Cyclone compete with other limited to 3 cards such as Battlin’ Boxer Veil, Aleister the Invoker, and Invocation, but it is also the best response to Treacherous Trap Hole, which is commonly seen in the small build. Some Harpie players choose to play one copy of Cyber Harpie Lady and one copy of Harpie Lady 1 since Cyber Harpie Lady can attack over Fire King Avatar Arvata when accompanied by some boost, whether it be from The Tie that Binds, Harpies’ Hunting Ground, or Harpie Lady 1. Attacking over cards such as Fire King Avatar Arvata as well as Fire King Avatar Barong can be notable early game prior to Fire King being able to optimally set up their graveyard with options to revive through Fire King Avatar Arvata.
Due to the life point control given through hand traps, the most common ability of Fire King is Destiny Draw. It is critical to know how to play around it whenever possible, especially when Fire Kings are usually lacking one particular card to set up their optimal plays. If enough damage is present on board to attack for game, it is wise to attack with the lowest attack monster first (preferably under 2000 attack points) followed by a monster that threatens finishing off the remaining life points in the event of Sphere Kuriboh, Battlin’ Boxer Veil, or Kiteroid. If a monster with 2000 attack points or higher attacks first, it gives the Fire King player the option of allowing that attack and then negating the subsequent attacks with Sphere Kuriboh}, Battlin’ Boxer Veil, or Kiteroid. Unlike the first case, not only did the Fire King player use handtraps to protect themselves, but they now have a live Destiny Draw with which they could choose any powerful card, including (but not limited to) Lightning Vortex, Onslaught of the Fire Kings, Fire King Island, or even Aleister the Invoker. Allowing the Fire King player to grab a card they need can have disastrous effects, usually allowing the Fire King player to clear the Harpie player’s field of their monsters and gain momentum if not win the duel outright. Note that the Fire King player does not have to be under 2000 Life Points to trigger Destiny Draw, and Fire King players often trigger it above 2000 LP using Battlin’ Boxer Veil. If they do have Veil, it is critical to keep track of how much damage has been inflicted and to make sure the amount done does not equal or exceed 2000 unless going for lethal. Gagaga Samurai can be useful here in that it has 1900 attack points and can attack twice, allowing it to attack over Fire King Avatar Arvata, Fire King Avatar Barong, Battlin’ Boxer Veil or deal a direct attack just under the !Destiny Draw threshold to check for hand traps and attack again there are none. If using The Tie that Binds and the opponent has either no cards in hand or no delays upon attacking, Gagaga Samurai can single-handedly inflict a lethal direct attack; however, be warned that if the opponent does have a hand, a Battlin’ Boxer Veil can both shut down this OTK, and allow the proc of Destiny Draw. As such, it is critical to only use this method of pushing for game in either surefire cases that the OTK will go through, or last resort cases. If multiple hand traps are present, then it unfortunately might be forced to trigger !Destiny Draw in order to make progress; however, it is still important to attempt playing around it until it is made clear in the duel that it is no longer an option.
A more conservative option to check for hand traps is Abyss Dweller, whose effect is especially effective in preventing all of the graveyard effects of Fire King monsters as well as Kiteroid. Note that Abyss Dweller will also prevent Fire King Island from destroying the opponent’s monsters if sent to the graveyard, so it must be destroyed prior to resolving Dweller’s effect. Moreover, in order to prevent the Fire King monsters from activating in the Standby Phase, it is critical to have the “Toggle Button” in the duel set to “On” so that Abyss Dweller can use its effect prior to the effects, as the “Toggle Button” set to “Auto” will not give a window of activation prior to the first Fire King effect being used. Recently, Fire King players have trended towards the counter trap Solemn Scolding to negate the Summon of a Harpie starter and destroy it, preventing cards such as Harpies’ Hunting Ground, Swallow’s Nest, and Forbidden Lance from having a chance to be used since counter traps are spell speed 3, and can only be countered by other counter traps. Moreover, its 3000 life point cost is easily enough to trigger Destiny Draw, which will make it more likely that Fire King can set up optimally.
Side deck/tech choices:
A choice for the large build:
Onomats
Onomats are an aggressive Xyz-oriented deck composed of a combination of Gagaga, Dododo, and Gogogo cards. Onomats received hits in May 2021 by having their essential searcher Gagaga Sister limited to 2 as well as having a rework of their skill !Onomatoplay to being able to return 1 archetypal card for 1 archetypal monster once per turn and twice per duel. Despite the hits they received, Onomats are a challenging matchup for Harpies. This is mainly because Onomats can choose to run Hey, Trunade! over Gagaga Sister and play a more rank 4 oriented build, making Number 18: Heraldry Patriarch a constant threat (see Harpie matchup for ways to play around it); however, it can also run multiple Mystical Space Typhoon alongside Gagaga Sister to easily out any potential backrow prior to comboing and have both rank 4 and rank 6 options. Since Onomatoplay greatly increases the consistency of Onomat, they will most likely have a potent hand going first or second.
Typically, Onomats struggle against hand traps such as Sphere Kuriboh, Kiteroid, and Battlin’ Boxer Veil since they have strong, but limited play. Unfortunately, hand traps synergize poorly with Cyber Slash Harpie Lady, since it needs a spell or trap activation or effect to trigger its effect to return a monster to the hand. Instead, chainable options to address their monsters such as Book of Moon, Treacherous Trap Hole, Forbidden Chalice, and Fiendish Chain can be good to slow Onomats down provided they don’t have their techs to remove spells/traps such as Hey, Trunade!, Mystical Space Typhoon, and Cosmic Cyclone. Fortunately, their searchable Gagagabolt is not so effective against Harpies, as it requires them to control a “Gagaga” monster to activate it, allowing Cyber Slash Harpie Lady to return a monster to the hand. Some of the large Harpie builds have included Hallowed Life Barrier since it ensures survival against OTK decks such as Onomat, as well as an opportunity to counterattack. Hysteric Sign or Harpie Harpist make use of the discard cost to grant a search in the end phase. This can sometimes allow for some mind games with the Onomat player, as if the Harpie player has access to a follow-up play, discarding Hysteric Sign or Harpie Harpist earlier can be preferable to bait the Onomat player into making Abyss Dweller rather than Number 18: Heraldry Patriarch. If not, however, then waiting until the very last possible moment to discard either Hysteric Sign or Harpie Harpist (preferably the battle phase) is the better option in order to have a potential follow up to the summon of Number 18: Heraldry Patriarch. Similarly to how some of the larger builds are choosing to tech Hallowed Life Barrier, some of the smaller builds are choosing to run Damage Diet instead. Not only does Damage Diet not need a discard as a cost, which is more of a liability in the small build since they generally main neither Hysteric Sign, nor Harpie Harpist, but it also nets pretty much the same result by only taking half of the total battle damage. This is usually enough to prevent an OTK since there would need to be a maximum of 8000 damage needed to be done in order to OTK with 4000 life points. Moreover, Damage Diet provides an additional activation from the graveyard to half effect damage, which is primarily used to trigger the effect of Cyber Slash Harpie Lady. Additionally, the banish allows Treacherous Trap Hole to remain alive since there must be no Traps in the graveyard to activate it. As a last means of additional survivability, siding LP Boost Alpha has seen success at high levels.
Side deck/tech choices:


Choices for the large build:
Thunder Dragons
Thunder Dragons, also known as Thundra, have had to adapt with their most popular skill Level Duplication having been changed to require a loss of 1000 Life Points to activate. Their players have chosen a variety of different skills to use in its place, including Destiny Draw, Allured by Darkness, Draw Sense: Spell/Trap and Fiend Farewell. All variants share the common goal of special summoning Chaos Dragon Levianeer, making this a difficult matchup for Harpies. Steelswarm Roach slows down the deck notably by preventing inherent level 5 or higher special summons such as Chaos Dragon Levianeer, Thunder Dragonduo, and the summon of any level 5 or higher Synchro monster. Moreover, Cyber Slash Harpie Lady being able to return monsters prevents the floats of the Thundra monsters, most notably Thunder Dragonroar, who replaces himself with another Thunder Dragon when banished or sent to the graveyard. The Tie that Binds is the preferred skill against them, both because Thundra runs minimal spell and trap cards, and because their main boss monsters range from anywhere between 2700-3100 attack points. Harpies can deal with the majority of the extra deck monsters Thunder Dragon uses with Cyber Slash Harpie Lady, especially when paired with chainable spells/traps such as Book of Moon and Treacherous Trap Hole.
Chaos Dragon Levianeer requires specific spells/traps to negate its effect. Cards like Divine Wrath and My Body as a Shield may seem like candidate options to stop Chaos Dragon Levianeer from destroying cards; however, they can be chain-blocked by the trigger effects of Thunder Dragonroar, Thunder Dragondark, and Thunder Dragonhawk banished to summon Chaos Dragon Levianeer. If this happens, then those cards mentioned above cannot be used in direct response to the destruction effect of Chaos Dragon Levianeer, resulting in not being able to negate it. Fiendish Chain, on the other hand, does not need to be chained directly, so it’s an effective means of negating Chaos Dragon Levianeer’s effect. Forbidden Chalice is another option, albeit less effective since Chaos Dragon Levianeer will be able to attack after its effect is negated since not being able to attack only applies if the effect resolves successfully.
Aside from the threat of Chaos Dragon Levianeer, Thundra tends to play the handtraps Sphere Kuriboh, Battlin’ Boxer Veil, and sometimes Trifortressops or Artifact Vajra. Depending on the character, reads can be made into which ones they use specifically. For example, a player using Yami Bakura will likely not be playing Sphere Kuriboh since it being a Fiend type conflicts with the optimal send of Fiend Farewell in Chaos Betrayer. As a result, it is more likely to play Trifortressops, which will be activatable at any point during a turn three summons have been conducted. Moreover, it will be unaffected by card effects if summoned by its effect with 2800 defense points to wall off an unboosted Cyber Slash Harpie Lady, but The Tie that Binds, Harpies’ Hunting Ground and Harpie Lady 1 help beat over it. If there is a delay upon the third summon, attacking directly with the boosted Cyber Slash Harpie Lady first is optimal so that there are no cancellations of attacks with the smaller monsters due to being unable to attack over Trifortressops. Against large builds (close to 30) using Yami Yugi or Yubel, it is likely they play a combination of hand traps, while for Thundra builds using fewer cards, hand traps can be considerably less of a factor. It is critical to note that Draw Sense: Spell/Trap, Allured by Darkness, and Destiny Draw all require a specific number of life points to be lost (1000, 1800, 2000 respectively). While it can be difficult to play around Draw Sense Spell/Trap specifically, it is wise to not trigger The Tie that Binds against Allured by Darkness if it will cause all of the Harpie monsters to be at 1800 attack or higher (see Fire King matchup for a detailed explanation on how to play around Destiny Draw).
Side deck/Tech choices:
Resonators
Recently, the newest mini-box King of Vermillion brought new archetypal cards to the Resonator archetype such as Crimson Resonator and Resonator Call. In addition to their new additions, the skill Demon’s Resonance was also released alongside it to boost the archetype. Not only do Resonators have a good matchup against Harpies, but it also was ultimately the deck that dethroned Harpie of its solo Tier 1 status and took its place on the throne as solo Tier 1.
While Resonators share Thundra’s vulnerability to Steelswarm Roach, making it a good turn 1 play against them with backrow to reinforce it, they have more room for spell/trap techs which they devote to cards like Book of Moon and Treacherous Trap Hole to out Steelswarm Roach. Additionally, some of their commonly teched monsters can deal with Steelwarm Roach: Doomcaliber Knight, which is searchable off of the Demon’s Resonance skill and has 1900 attack points to crash into Steelwarm Roach, as well as Caius the Shadow Monarch, which has started to gain popularity by taking advantage of Crimson Resonator and Wandering King Wildwind special summoning themselves. With all their potential counters to Steelswarm Roach, synchro summoning Cyber Slash Harpie Lady and fuelling the graveyard for Harpie’s Feather Rest to draw into tech cards that disrupt plays is generally the better option if it’s available. This is largely due to the fact that Steelswarm Roach cannot immediately detach its xyz material to make Feather Rest live nor does it grant the extra draw for Harpie’s Feather Rest
Solemn Scolding synergizes particularly well with Resonators because they gain 2100 life points as part of their standard turn 1 play using Red Resonator summoned via Crimson Resonator to target Red Rising Dragon, putting them at 6100 life points. This provides enough to at least have a comfortable cushion of life points after using Scolding, as well as the ability to use another copy of Scolding on a later turn, by which time they’ll likely have gained even more life points. This is particularly bad for Harpies, as Solemn Scolding can negate the normal summon of Harpie Perfumer or Harpie Channeler prior to their effects, or even before Harpies’ Hunting Ground has a chance to destroy Solemn Scolding. As a result, this renders Swallow’s Nest, Elegant Egotist and Forbidden Lance irrelevant as a Harpie monster needs to be on the field to use any of these cards, and Solemn Scolding cannot be chained to other than by other respective counter trap cards. Mystical Space Typhoon is starting to see more use in some main boards in order to address the potential Solemn Scolding in order to actually play the game.
Stygian Dirge is another great card in this matchup, which not only can be flipped to trigger Cyber Slash Harpie Lady at any time, but also shuts down the majority of their synchro plays. Their monster lineup is almost entirely made up of dark attribute monsters besides Red Resonator and occasional tech monsters, so Shadow-Imprisoning Mirror is especially effective as well. Another problem Resonators present and force Harpie players to be aware of is Obelisk the Tormentor, as Resonators can put three monsters on board through special summons alone and normal summon it on turn 1. As an untargetable monster with 4000 attack and defense points, Harpies have no innate outs to Obelisk and are forced to dedicate tech and extra deck slots to cards like Lightning Vortex and/or Number 91: Thunder Spark Dragon to deal with it.
On top of all their defensive hindrances to consider, Resonators can also regularly one-turn kill through Infernity Doom Dragon into Hot Red Dragon Archfiend Bane as well making two copies of Dark End Dragon, among other combinations. Some builds use Hey, Trunade! to facilitate this on top of Mystical Space Typhoon, so the same continuous and lingering chainable backrow that are effective against Onomats can be effective here, such as Hallowed Life Barrier, Damage Diet, Stygian Dirge and Shadow-Imprisoning Mirror as well as the skill LP Boost Alpha.
Wandering King Wildwind provides a follow up play by banishing itself from the graveyard to add another Crimson Resonator the next turn, then use the Demon’s Resonance skill to shuffle back another card which they will have after drawing for turn to add another Wildwind and go into another Red Rising Dragon combo. Abyss Dweller can prevent this after having secured control of the board, as well as having 1700 attack points to take out a defense position Red Rising Dragon. Anti-graveyard techs such as D.D. Crow, The Transmigration Prophecy, Foolish Return, Showdown of the Secret Sense Scroll Techniques and Necrovalley can be used to stop Wildwind’s recovery as well as Red Rising Dragon’s revival effect. Additionally, Sealed Tombs can be a particularly effective skill against Resonators, as their initial 2100 life point gain can be taken advantage of with Sealed Tombs requiring the opponent to have 1000 more life points than the user, so it can be freely activated and turn off the effects of Wildwind from banishing itself, as well as the revival effect of Red Rising Dragon. No Mortal Can Resist can be triggered as well to change their monsters in their graveyard to Skull Servants, but Sealed Tombs prevents the revival of monsters not yet in the opponent’s graveyard, as well as being more versatile in other matchups. Another benefit of Sealed Tombs is that it doesn’t obstruct the effects of Harpie’s Feather Rest or Harpie Oracle in the same way that Necrovalley does with Sealed Tombs only preventing banishing and revival from the graveyard.
Side deck/tech choices:
Choices for the large build:
Water Xyz
Water Xyz has similar aims to Harpies in establishing a disruptive monster (usually an Abyss Dweller with an Atlantean Heavy Infantry attached). This is made possible by the Territory of the Sharks skill, which changes water monsters to level 4. Water XYZ can usually summon 2 water monsters easily, whether it be through the special summon of Deep Sea Diva or Buzzsaw Shark, the additional normal summon of a Level 4 or lower Sea Serpent through Atlantean Heavy Infantry, or the special summon of Silent Angler. On top of reasonably consistent summoning, the deck plays similar cards to that of the smaller build of Harpie in Book of Moon and Treacherous Trap Hole. Despite all of this, Water Xyz is a favorable matchup for Harpies. Territory of the Sharks restricts the attribute usage to water only, eliminating Number 18: Heraldry Patriarch from being an option altogether as well as preventing Water Xyz from playing handtraps, barring the seldom used Dragon Ice. As a result, Water Xyz is more reliant on backrow, which can be destroyed by Harpies’ Hunting Ground, so the Harpies’ Hunting Ground skill is preferred for this matchup for this reason and because Water Xyz doesn’t have monsters with particularly high attack or defense points requiring The Tie that Binds. Smaller Harpie builds have no graveyard-activatable effects to be restricted by the effect of Abyss Dweller, though large builds have Hysteric Sign and Harpie Harpist affected, so their matchup with Water Xyz is not as favoured.
While Atlantean Heavy Infantry seems simple on the surface, there is a lot to keep in mind with it. When Atlantean Infantry is sent to the graveyard as a cost to trigger a water monster’s effect (usually Abyss Dweller), it can destroy a face-up card on the field, potentially disrupting a Harpie combo if no follow-up like Swallow’s Nest is present. Ideally, forcing the effect of Abyss Dweller through cards like Book of Moon or Treacherous Trap Hole is a good way to play around such disruption. Unfortunately, using cards that negate Abyss Dweller such as Fiendish Chain or Forbidden Chalice do not have the same merit since they do not prevent the cost of sending Atlantean Heavy Infantry to the graveyard, resulting in a wasted card and a face-up pop. Fortunately, if such cards are used against Atlantean Heavy Infantry while face-up on the field, it will prevent the additional normal summon of a Level 4 or lower Sea Serpent monster. While negating the monster that sends Atlantean Heavy Infantry is ineffective, cards that would relocate it such as D.D. Crow or The Transmigration Prophecy will prevent the effect from being used. Moreover, cards that can specifically negate the effect of Atlantean Heavy Infantry in the graveyard such as Divine Wrath will also work, provided no other simultaneous effect goes on the chain after it (this is also the same with Atlantean Marksman). While the smaller builds generally do not care about Abyss Dweller turning off graveyard effects, the larger build is more susceptible to it with both Hysteric Sign and Harpie Harpist not being able to activate after Abyss Dweller resolves its effect. As a result, the larger builds can merit from negating Abyss Dweller instead of Atlantean Heavy Infantry, especially in the case of a card such as Divine Wrath, which not only negates and destroys Abyss Dweller, but also has a chance to provide a discard outlet for Hysteric Sign and Harpie Harpist to trigger their effect in the end phase.
Side/Tech choices:

Cyber Dragons
Cyber Dragons, also known as Cydra, are an aggressive OTK (One Turn Kill) based fusion deck. Since the May 2021 restrictions, the deck now has Storm limited to 1, and Cybernetic Fusion Support limited to 2, effectively reducing their copies of Cybernetic Overflow and Cybernetic Fusion Support to 1 each. Despite their nerfs, they continue to peek their head into the meta, occasionally topping notable events. Cydra tends to rely on disruptive spells/traps like Book of Moon and Offerings to the Doomed as well as their searchable Cybernetic Overflow since they don’t have access to disruptive Extra Deck monsters.
This is a favourable matchup if using !Harpies’ Hunting Ground skill, but closer to even with The Tie that Binds. Since Cydra is OTK oriented, The Tie that Binds is usually not a problem in the grand scheme of things, sometimes even benefitting from the skill since it brings them closer to triggering Cyber Style, with it having a 2000 Life Point restriction to use. Moreover, on top of Cybernetic Fusion Support being a guaranteed trigger for Cyber Style, Cyber Dragons also play Cosmic Cyclone, and usually Herald of the Abyss to help trigger it. While Cosmic Cyclone can be problematic if there is only one backrow set, Harpies can protect themselves from Herald of the Abyss outing Cyber Slash Harpie Lady, provided another Harpie monster is on the field alongside it. Number 18: Heraldry Patriarch can be useful in this matchup as Cyber Dragon Core, Cyber Dragon, Cyber Dragon Vier and Proto-Cyber Dragon are all named “Cyber Dragon” on the field, so by choosing one, Heraldry Patriarch will destroy the others. It also has 2200 ATK and DEF, which is just enough to prevent Chimeratech Rampage Dragon from attacking over it. Maestroke, the Symphony Djinn is another Xyz Monster that can be good in this matchup as it has 2300 DEF and can detach an Xyz Material instead of being destroyed, giving it resilience against both Offerings to the Doomed, as well as attacks from Cyber Twin Dragon. Moreover, it can force out Cybernetic Overflow since a flipped down Cydra is unable to be used with Overflow, similar to Book of Moon. Fusion Gate and Cybernetic Fusion Support is their most scary combo, but Cyber Slash Harpie Lady paired with a backrow can potentially stop it early by returning the first Chimeratech Rampage Dragon to the extra deck prior to it sending more fuel to the graveyard for the next fusion summon; however, if Cydra can still summon another Fusion afterwards, it will most likely be a loss.
If a Harpie player chooses to tech Mystical Space Typhoon, it is a potent option to destroy both Fusion Gate as well as a potential backrow to push for lethal. Generally, against Fusion Gate, it is advised to wait until the Cydra player uses the effect to attempt Fusion summoning, and then Mystical Space Typhoon should be chained. This is mostly relevant when they attempt to use materials from the hand since it will provide insight that their hand has a specific number of Cydra monsters.
Side deck/tech cards:

Yosenju
Yosenju is an anti-meta deck that recently got stronger with the release of Fire Formation - Tenki. Yosenju monsters are generally indifferent in being returned by Cyber Slash Harpie Lady to the hand since the majority return to the hand in the end phase anyway. Moreover, the effects of Yosenju Kama 1, Yosenju Kama 2, and Yosenju Kama 3 all grant an additional normal summon of a Yosenju other than itself when normal summoned, allowing the Yosenju player to have plays despite disrupting the first normal summon. On top of resilient effects, they also have multiple ways to return monsters to the hand in Yosenjus’ Sword Sting and Yosenju Kama 1. Moreover, being a level 4 oriented deck, Yosenjus can easily make Number 18: Heraldry Patriarch if they so desire. Lastly, Yosenju decks tend to use Destiny Draw in tandem with hand traps like Sphere Kuriboh, Battlin’ Boxer Veil and Kiteroid, as well as their own in-theme hand trap in Yosenju Oyam. As a result, Yosenju does have a favourable matchup against Harpie, most notably against The Tie that Binds variation, while the Harpies’ Hunting Ground variation is closer to even.
Harpies Hunting Ground forces them to use their Yosenju Sword Sting early, allowing a potential chain of either Swallow’s Nest or Forbidden Lance. Moreover, Treacherous Trap Hole is easily the best backrow against the deck since the destruction of two Yosenjus is notably devastating for their future plays with almost all of the Yosenjus relying on other Yosenjus to get their maximum benefit, barring Yosenju Kama 2, who can attack directly regardless of other Yosenjus being on the field with it. Any attack point boost can allow a Harpie monster to attack over Yosenju Oyam since it only copies the original attack of the monster for its attack and defence, and not the boost. Despite these conveniences, it is critical to play around Destiny Draw (see Fire King matchup for a detailed explanation on how to play around it). Allowing the Yosenju player to add an additional card can allow them to attack for 4000 damage with Number C39: Utopia Ray, either through them being under 1000 LP and drawing into Hey, Trunade!, or by drawing into Cosmic Cyclone to out a backrow, bringing their life points to 1000 or below to make Number C39: Utopia Ray live.
If there is no delay on a backrow, it is likely Drowning Mirror Force since it has notable synergy with the Yosenjus returning themselves to the hand during the end phase, allowing Drowning Mirror Force to potentially be live upon the declaration of an attack. It is advisable to keep one monster in defence mode if there is ample damage on board to go for lethal, or to wait until Harpies’ Hunting Ground can pop it to go in for a safe push.
Side/Tech choices:
Lunalights
While Lunalights are not particularly popular in tournaments after having had multiple key cards placed on the Limited to 3 list (Lunalight Yellow Marten and Lunalight Emerald Bird), this deck received a degree of compensation for their lost cards with the release of Fire Formation - Tenki. Lunalights are Harpie’s worst matchup in general. The main problem Lunalights pose is Lunalight Sabre Dancer, which starts at 3000 attack and gains 200 more for each beast-warrior monster that is either banished or in the graveyards. As such, even if only the materials used to fusion summon it are in the graveyard, it has 3600 attack, and stands only to gain more as the duel progresses. Harpies are forced to go out of their way to answer an untargetable monster with so much attack, and must tread carefully when using an extra deck monster. This is largely due to the fact that Lunalight Fusion is able to fuse using one material from the deck in addition to materials on the hand or field when an extra deck monster is present on the field. Moreover, when Lunalight Crimson Fox is used as material, they can reduce a face-up monster’s attack to 0 and OTK with Lunalight Cat Dancer, whose effect allows it to prevent a monster from being destroyed by battle once so that it can attack it again, on top of inflicting 100 effect damage per attack, ultimately resulting in 5000 points of damage. 5000 damage is particularly significant because Lunalight Crimson Fox needs to sometimes negate a card that targets a “Lunalight” monster by banishing itself, resulting in an increase of both player’s life points by 1000. Additionally, a second Lunalight Sabre Dancer would also likely have over 4000 attack, which is more often than not sufficient to OTK after Lunalight Crimson Fox lowers a monster to 0 attack. Some cards that can be used to out Lunalight Sabre Dancer are Lightning Vortex (which conveniently comes in the same mini box as Harpies), Number C39: Utopia Ray (note that it will not be enough to do 4000 battle damage over Sabre Dancer because it only reduces their ATK by 3000), and Number 91: Thunder Spark Dragon (which requires 3 Xyz Materials but can destroy Sabre Dancer). Despite the numerous solutions, this does not guarantee a win against the deck, hence the nature of Lunalight being a bad matchup.
Mystical Space Typhoon can be chained to the activation of Fire Formation - Tenki to prevent it from resolving and they cannot search nor activate a second Tenki the same turn. Forbidden Lance can be used to prevent their monster on the field from being used as a Fusion Material by making it unaffected by Lunalight Fusion. Another trick to play around Lunalight Fusion is to chain Book of Moon targeting one’s own Extra Deck monster in response, at which point, the Lunalight player will no longer be able to use Fusion Materials from their deck, potentially cancelling out their Fusion Summon completely. Furthermore, after the monster is flipped face-up it is no longer considered as having been summoned from the extra deck, even if it’s clearly an extra deck monster, so Lunalight Fusion still cannot send materials from the deck.
Side choices/techs:


Harpie Ladies are a dominant force that can only grow weaker as other decks are introduced, and nerfs get introduced to the deck. In current time, it is the most consistent deck available, both for combo potential, and for outing side deck counters with Harpies’ Hunting Ground. Moreover, The Tie that Binds helps dominate matchups where Harpies’ Hunting Ground lacks in strength. Lastly, the deck is considerably cheap in comparison to other meta decks, so it is a recommended deck to pick up if one wants a strong deck for ladder.
- Tnobes99: Shoutouts to PHX and VS for helping test and providing guidance through the making of this guide. Additionally, shoutouts to Mihawk and Drizzels for their insights on the Harpie mirror from both a small build and large build perspective respectively, Vbellafiore for his insight on the Blue-Eyes matchup, and lastly to Maz Li again for his contribution to the probability chart earlier in the guide.
- Dylligraphy: Shoutout to TsunTsun for having his matchup chart for reference which can be found here:. Additionally, shoutouts to FireRed550 for winning the most recent MCS with Harpies, Rezileen and Atlas for lots of helpful pins, and lastly to Tnobes99 for revising the guide throughout our collaboration.
Guide formatted and uploaded by RandomPl0x.
Thumbnail designed and created by RandomPl0x.